I apologize for being somewhat neglectful. I'm getting married in a little over two months and that plus the stress of papers and presentations (which seem to be the new favorite thing of professors) has driven me a little crazy. It's been a really great semester so far, over all. And I've been working on posts but haven't finished them. (I also apologize for flaws in the blog design. I'm getting a little frustrated with Weebly….)
Anyway, so I'm home for the week and it's time to finish my dress if at all possible.
- Part one
- Part two
- Part three
Read on for the adventures of The Wedding Dress.
Anyway, so I'm home for the week and it's time to finish my dress if at all possible.
- Part one
- Part two
- Part three
Read on for the adventures of The Wedding Dress.

The first thing I needed to do was fix the button area. This image is the back of the bodice. As you can see, it is a little slopping – the top edges are sewn sloppily, the bottom edge bunches up, and there's an extra line of stitches down the left.
The reason for the extra stitches is that the pieces wasn't as wide as I needed, so I just folded it as wide as I needed and sewed the edge where it fell. It looked bad so I pulled out those stitches, attached another piece of satin to that edge with a quick seam, and attached the new piece to the official seam. I wish I'd thought to take pictures so I could illustrate.
The reason for the extra stitches is that the pieces wasn't as wide as I needed, so I just folded it as wide as I needed and sewed the edge where it fell. It looked bad so I pulled out those stitches, attached another piece of satin to that edge with a quick seam, and attached the new piece to the official seam. I wish I'd thought to take pictures so I could illustrate.
| The line where my thumb is in the accompanying picture is where the new piece begins. Then the wild seam beside it is the one I attached it to. Then, to fix the bunching problem, I ran stitches down along the seam and then outward toward the buttons after the second to last button on the bodice in order to adjust the width. I think the back needs to be ironed a little bit but it's looking better. Still haven't tested it all the way yet so it may still need adjustment. I used a long stitch in case I need to remove it. | 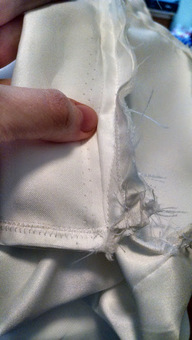 |
I decided that both the bodice overlay and the skirt overlay (both in chiffon) will be held on with a sash that I tie in the back. I don't have enough material to make one, so I bought one through Etsy. Hopefully it will get here on Saturday so I can do a final dress fitting with all the pieces.
So now I need to finish the edges of the chiffon. To do so, I'm using a tutorial I found this morning. Usually, if instructions tell me to press the seam, I skip it because I'm lazy and impatient. But today I pressed the chiffon because… well… it's chiffon. It's slippery as a fish. I tested the iron on scrap and found that the lower settings were useless; so I turned it all the way up and turned on steam. That worked very well and didn't seem to damage the material at all. The edge of the skirt seemed to go on forever… and on and on…. If you've ever made a skirt or hemmed anything with a curve to it, you know how tough that can be. Things don't fold on a curve by choice. But finally I reached the beginning of my circular path… only to find that I'd pressed the seam in the wrong direction.
Of course, the nature of the beast is that now that the seam was pressed the wrong way, if I ditched pressing and tried to sew it bent back against its new fold, it would have been all the more difficult about it. ……… So I filled my iron up with more water and set to work fixing my mistake.
So I hemmed the bottom edge, the top edge, and the edges of the slit in the back (I don't actually know how to do this correctly but I don't think it will much matter…).
I fake-serged the short sleeve edges, hemmed the bottom edge and the edge of the slit in the back (that I cut so I can get it on) and the neck edge.
And I was done! Unfortunately, I was in such a rush that I failed to take more pictures. I also found veil tutorials and I went out and bought materials. Unfortunately, I did not have the time and I forgot to bring them back to school with me so they will have to be completed after graduation.
Almost there!

 RSS Feed
